

This post contains affiliate links
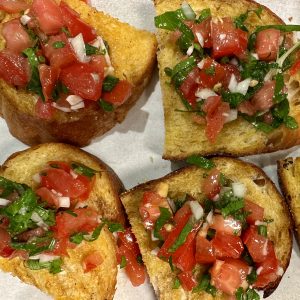
Best Ever Bruschetta

Is there anything more satisfying than crunchy grilled bread topped with flavourful tomato goodness? We think not. Bruschetta is one of those dishes that feels effortlessly elegant—like it belongs at both a backyard BBQ and a Tuscan winery. And if you’re thinking bruschetta is just tomatoes on toast… oh, friend, we’ve got a delicious story to tell.
As she says, Jody got these tips and tricks from her “mom’s cousin’s aunt’s friend” and we took it to the next level. It’s all about the ‘dip’. Dipping the bread in the flavourful olive oil before heading out to the grill (or in the oven). So the next time you’re at your local farmer’s market and tomatoes are ripe & cheap, pick up a whole bunch!
What is Bruschetta, Really?
Bruschetta (say it with us: broo-SKEH-tah, not broo-shetta) comes from the Italian word bruscare, which means “to toast.” It originated in Tuscany in the 15th century as a way for olive oil producers to showcase the flavour of their freshly pressed oil. Farmers would toast bread over coals, rub it with garlic, drizzle on that golden oil, and maybe—maybe—add a little tomato.
Over time, it evolved into the classic tomato-topped appetizer we all know and love. Today, Bruschetta is a celebration of simplicity: ripe tomatoes, good olive oil, fresh herbs, and crispy bread. Our addition of fresh lemon juice really takes it to the next level. When done right, it’s pure magic.
Our Chef-Inspired Tomato Bruschetta
This is the Bruschetta we serve at the studio when we want to impress without trying too hard. The twist? We add green onion and lemon juice for a bright punch, giving it just a little zing that keeps people coming back for more.
- Prep Time: 10 Minutes
- Cook Time: 5 Minutes
- Total Time: 15 minutes
- Yield: 2–4 Servings 1x
Ingredients
- 4 Roma tomatoes, seeded and diced
- 3 green onions, finely chopped
- 1 garlic clove, minced
- Juice of 1 lemon
- 1–2 Tbsp chopped fresh parsley or basil
- 1/2 cup good quality olive oil
- 1 baguette, sliced
Instructions
- Prepare the Tomato Mixture: In a medium bowl, combine the diced tomatoes with a good pinch of salt. Let this mixture hang out while you prep the other ingredients. This will firm up the tomatoes and help bring out the flavourful tomato water.
- Add in the green onions, garlic, lemon juice, and herbs. Pour in enough olive oil to fully cover the mixture. Don’t skimp here. If may need more than 1/2 cup. Let it sit for 10–15 minutes while you prep the bread. This gives everything time to mingle.
- Dip & Toast/Grill the Bread:
- Oven Method
Preheat your oven to 400°F (200°C). ‘Dip’ each baguette slice into the olive oil from the tomato mix and place them on a baking sheet. Bake for 7–10 minutes, or until golden and crunchy. - Grill Method
Preheat your grill to 375–425°F (190–220°C). ‘Dip’ bread and grill the slices directly on the grates until they develop lovely grill marks and a crispy edge. This adds an amazing smokiness. (check out video below for a quick tutorial on the oh-so-important ‘dip’) - Assemble and Serve: Spoon the tomato mixture over your warm toasted bread. Serve immediately. Voilà—seriously better than restaurant-quality Bruschetta, made at home.
Notes
Tips for Perfect Bruschetta
You know we love a good tip. Here’s how to make your Bruschetta even better:
-
Tomatoes: Use Roma tomatoes—they’re less watery and full of flavour. Cherry tomatoes work too!
-
Oil Matters: Use the best olive oil you can afford. This dish is all about those raw, fresh flavours.
-
Garlic Optional: Rub a raw garlic clove on the bread after toasting for extra kick.
-
Acidity: A splash of balsamic vinegar or red wine vinegar adds a lovely tang.
-
Make Ahead: The tomato mix can be made a few hours in advance and kept in the fridge—just don’t top the bread until right before serving.
Substitutions
No Roma tomatoes? Try:
-
Cherry tomatoes, quartered
-
Heirloom tomatoes for colour and flavour variety
No green onion?
-
Swap for red onion (very thinly sliced) or fresh chives
No baguette?
-
Any rustic loaf will do. Ciabatta is a close second.
William Natter1 year agoWe have taken many classes over several years, and they never disappoint! Kristie & team always have great pointers and tricks to learn in the video. We love the Japanese burgers, and they are always a hit with guests. That's the thing: you make the recipe at home, it doesn't take a long time, and the result is so good that you want to make it again and again. Just try one, you'll see. 🙂James Blashill1 year agoI had such a fantastic experience at the cooking class! My daughter and I had an amazing time — our Bao Buns and Crispy Chicken turned out delicious, and we learned so much throughout the session. It was a fun, inspiring, and rewarding evening. I can’t wait to come back for another class. Highly recommend!ABM Janzen1 year agoOur virtual cooking class experience was top notch! Well organized, wonderfully communicated, and entertaining! A delicious outcome which boosted our confidence to try more challenging recipes in the future. Highly recommend!lori letts1 year agoI have taken a few classes in the past - always find the products delicious, and I enjoy the challenge of trying to keep up 🙂
I subscribe the updates and get links to recipes - I recently made the Olive Oil Lemon cake. It turned out delicious – as you said in the description, very moist! My daughter has a birthday in strawberry season and typically she asks for strawberry shortcake with a traditional shortcake recipe… I served the lemon came this weekend with a bit of whipping cream and fresh strawberries (your picture was quite enticing) and her comment was that her birthday request this year would be to replace the traditional shortcake with this recipe!Kat Garrod1 year agoI've taken several on-line cooking classes from The Culinary Studio and have really enjoyed each one. The recipes are delicious and the instructions are very well laid out. I always learn new cooking tips and skills.Cyn Vavasour1 year agoIt has been most likely a year and a half since I’ve made moussaka. Having the recording available was a godsend. So good and lots of leftovers! Having the recording is priceless!
I made Dan Dan noodles last month and again referred to the recording as it has been awhile. I was grateful for the reminders, tips and tricks. Not to mention, I love to cook with Kirstie and Jody. They make it so much fun!
Most of the meals I make are from your repertoire. I think I have close to 60!Donna Turner1 year agoLove these ladies! Classes are easy to follow, informative, filled with all kinds of tricks & tips and best of all DELICIOUS!! This is our "night out" dining adventure that we can re-do & show off to our family & friends.Linda Brodrecht1 year agoMy husband and I joined the Valentine's Day Date Night cooking class. Very enjoyable experience full of informative tips and thorough explanations followed by a delectable meal. Thank you Kirstie & Jodie. We'll be back!Jeff Eitel1 year agoLots of fun and food turned out great.John H1 year agoI recently did an online Lamb Briyani class. It used some cooking techniques I wasn't familiar with and produced a dish that was as tasty as the best Indian food I've ever had the pleasure of enjoying.R S1 year agoI have done a few classes with the Culinary Studio and always enjoy the classes and the fabulous meals. They deliver the food to my door all prepped for the class if I like (which I do!). Highly recommended.Bruce White1 year agoWe did a virtual zoom cooking class. It was better than cooking classes we have done in a actual class. We really enjoyed our ourselves. We have made the meal a couple of times since the class. We have friends over for the session and have great restaurant quality mealsIain Peck2 years agoThe Culinary Studio is an wonderful online chef duo!
You will learn delicious recipes taught in real time from start to end by two good friends who want nothing more than to teach you how to cook and and have fun doing it. Class presentation is practical and encouraging with one chef starting and one playing 'catch up' so you do not miss anything and no question will go unanswered!
The recipe with food pack is perfectly packaged and always arrives on time to make it easy so you do not have to shop!
Several recipes from the Culinary Studio are in our regular rotation!
Excited to keep cooking with you Kirstie and Jody!Liana Kinzie2 years agoOnline classes have allowed me the convenience to open my computer and learn in the comfort of my home and to do the class on my own schedule rather than missing out due to life's interruptions. Classes are paced well and the chef's are ready to answer your cooking questions even if they are unrelated to the class. I have used the recipes frequently in my day to day life and recently at an event where I overhead participants raving about the soup and cookies I had prepared, which were from Culinary Studio class recipes.
I was at the Studio for the very first class they held and I have continued to take classes for the past 13 years. While some things have changed over the years, the quality, knowledge and skills Jody and Kirstie bring to each class has not.The skills I learned through the their instruction have been used daily.B Ellert2 years agoTo Chefs Kirstie & Jody! My family and I have thoroughly enjoyed the recipes and techniques we have acquired by following your live sessions and on-demand courses available on your website. You have a casual and an informative style that is very appealing. Most importantly both of you thrive on good food and beverage as much as we do! Bravo - we hope your future includes many more years of teaching and developing new dishes. Thank you. 🙂


No fresh herbs?
-
A pinch of dried oregano works in a pinch—but fresh basil or parsley is ideal
What to Know/Avoid in This Recipe
-
Avoid soggy toast by toasting the bread well and topping it right before serving.
-
Don’t refrigerate the assembled bruschetta. The bread will lose its crunch.
-
Don’t overseason—good tomatoes and oil do the heavy lifting. Salt lightly.
-
Avoid seedy, watery tomatoes. Always remove the seeds for best texture.
Storage Recommendations
Bruschetta topping: Store in the fridge in an airtight container for up to 2 days. The flavours get better with a little time—but remember, this is a fresh dish.
Toasted bread: Can be made a few hours ahead and kept uncovered at room temp. Don’t refrigerate it or it’ll go stale.
Assembled bruschetta: Eat it all up! Once topped, it’s best enjoyed immediately.
FAQ
Can I make bruschetta the day before?
Yes, you can prep the tomato mixture the night before. Just toast the bread and assemble right before serving.
Can I freeze bruschetta?
Nope. This dish is meant to be fresh—freezing ruins the texture.
Is bruschetta served hot or cold?
A little of both! The bread should be warm, but the topping is room temperature or chilled.
What’s the difference between crostini and bruschetta?
Crostini uses smaller, thinner slices of bread—typically from a baguette—while traditional Bruschetta comes from a larger, rustic loaf like sourdough or ciabatta. Both are delicious!
Can I add cheese to bruschetta?
Absolutely! A little shaved Parm, fresh mozzarella, or burrata makes it even more indulgent.
Conclusion: The Beauty of Bruschetta
At its heart, Bruschetta is a love letter to good ingredients. It’s proof that simple things—done right—can be unforgettable. Whether you’re hosting a dinner party or just craving something fresh with your wine, this dish never disappoints.
So grab a loaf, dice those tomatoes, and pour that olive oil with confidence. You’re about to make your new favourite appetizer.
🍴 Want to take your cooking further?
Still have more tomatoes? Make our best ever Pico De Gallo with three game changing tips!
Join our Online Cooking Classes where you’ll learn chef techniques like this and more. From fresh pasta to pro-level sauces, we’ll walk you through the why behind the recipe—so you can level up your home cooking game.


![churros press from spain ]](https://blog.theculinarystudio.ca/wp-content/uploads/2025/01/churros-press-300x260.jpg)
